Pfsense is a FreeBSD based Open source security distribution. Pfsense is basically using as a gateway device (firewall and router). But it can be expandable as many Server services like DNS, DHCP, Proxy Servers. Here I is the step by step procedure to install a Pfsense based Proxy server.
Download pfSense CD from here
http://www.pfsense.org/mirror.php?section=downloads
Write The ISO file to a CD and boot from pfSense CD.
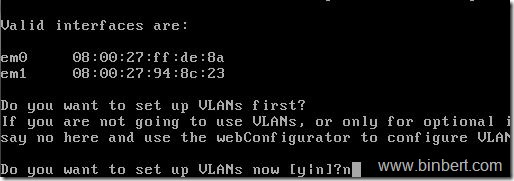
Select “n” if you don’t have a Vlan setup
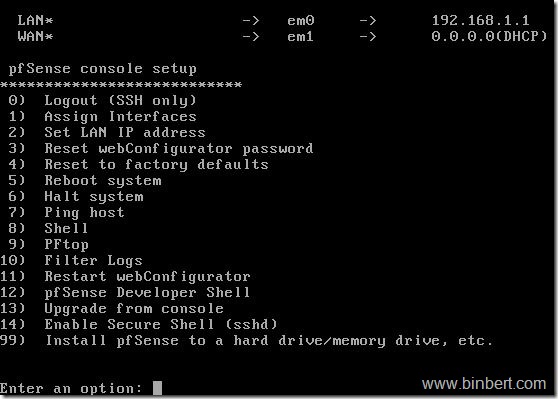
Sigh Lan and wan Interface
It will automatically asign 192.168.1.1 for the lan interface.
Set Lan IP Address
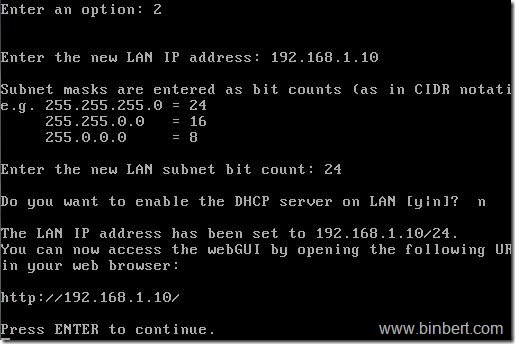
select option 2 and enter your lan IP, it will ask for subnet, you have to enter subnet as bit counters
Eg
255.255.255.0 = 24
255.255.0.0 = 16
255.0.0.0 = 8
It will also prompt for set this server as a DHCP server. If you want to set this server as a DHCP server select “y”. If you are using static ips for client pcs just select “n”
After applying the LAN IP address, you can access the pfSense web interface using http protocol
Eg : http://192.168.0.10
Install pfSense to a hard drive / memory
Select option “99” to install pfsense to your local media.
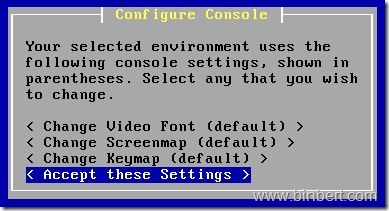
It will start installation in first setp and ask some settings to change video font screenmap keymap etc .. select “<Accept these Settings>” for default settings
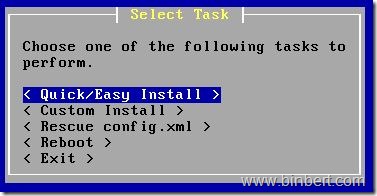
Now select “<Quick/Easy Install>”
System will prompt for a confirmation If you press <OK> It will erase all data from first HDD
So make sure that u have data backups if necessary
Select multiprocessing kernel
Reboot the server when it prompt
Initial configurations in web interface
Now go to web interface
It will ask for user id and password
Default user id and passwords for pfsense server as follows
User : admin
Password : pfsense
On this screen you will set the General pfSense parameters.
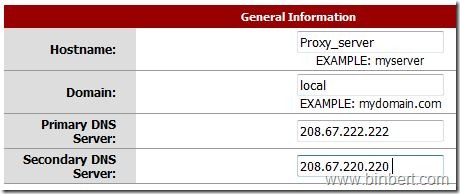
Add hostname, and domain name, Primary and Secondary DNS server in this screen, here I used Open DNS to improve security, you can give your DNS
Eg : 208.67.222.222 & 208.67.220.220
Time Server Information
Enter your time server name and Timezone and click next
Configure the Wide Area Network information
If your internet connection is based on DHCP, click next. No changes required in this area.
If your internet connection with a static IP or a PPPoE / PPTP you can configure details in this window.
Configure LAN Interface
We already assigned an ip address for lan from the terminal itself. Click next if there is no change.
Set Admin WebGUI Password
Set your administration password for web interface management. Currently we entered with default password. It is strongly recommend to change the password now itself.
Reload
Click ‘Reload’ to reload pfSense with new changes. If you changed the password, pfSense will ask you to log in again.
This will take some time to reload automatically. You can use the same ip url to reload quickly.
Install Squid
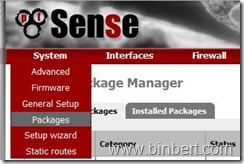
Go to System > packages, it will load all the supported packages, Select squid and click “+” button
Squid package and its dependencies will be automatically installed in this server
Executing custom_php_resync_config_command()…done.
Writing configuration… done.
Starting service.
Installation completed. Please check to make sure that the package is configured from the respective menu then start the package.
Now squid is installed and basic Server is ready to work as a proxy, by default no one can use this proxy. Access control system should configure for Allowed subnets,
Go to Services > Proxy Server > Access Control and add Allowed subnets. You can add ips or subnets. separate entries with space. Basic blacklisting / white listing is possible in this configuration window
Eg : 192.168.1.0/24
Now squid will serve all sites to 192.168.1.0 network. by default squid is running on tcp port 3128
Configure your client proxy settings with your server ip and 3128 port
Eg
IP address 192.168.1.0
Port : 3128
For an advanced Proxy Server it is required Standard blacklists and reporting features. Squid Guard and Squid reporting packages are available for Pf Sense. My next article is about How to Configure a PfSense with SquidGuard and Lightsquid
 Binbert Technology | Computer | Security | Networking | Mobile







[…] and Lightsquid in a pfsense Squid Server. Earlier we have published an article about the how to setup a proxy with pfSense Firewall distribution. as we know SquidGuard is a URL redirector used to use blacklists with the Squid. Squid can perform […]
i am working as a System administrator in a MCA collge. one of my server is linux (fedora) using proxy squid to block site and limit.
any software to modify and configuring in web based
my no : 999 5628777
email:[email protected]
@Rahul,
I think you are using SquidGuard along with Squid You can use SquidGuard Manager to manage ACLs
http://squidguardmgr.darold.net/
Hai… i am using pfSense with squid,squidguard,lightsquid and its working fine at the time of installation but after two months when i restarted it taking a 20 mins initially it was 3 mins.While booting the package syncing is too slow the boot time is increasing day by day.any idea?? are you using pfsense ? if you are using what about you package syncing??
Check whether the drive is full or not. Either with the log file or some other
Run #df -h
Mounted Filesystems
Mount Partition Percent Capacity Free Used Size
/ /dev/da0s1a 5% (2%) 50.60 GB 3.19 GB 58.46 GB
/var/run /dev/md0 1% 3.29 MB 30.00 KB 3.61 MB
/dev devfs 100% (100%) 0.00 KB 1.00 KB 1.00 KB
/var/dhcpd/dev devfs 100% (100%) 0.00 KB 1.00 KB 1.00 KB
Totals : 5% 50.60 GB 3.19 GB 58.46 GB
Goodmorning Sebastian.
I have the guide but I still have some question if you can help.
I am trying to setup the pfsense on my job but I have some defaults conditions that cannot be change.
My IP range is 10.169.92.1 up 95.255, mask 255.255.252.0 and cannot be changed
my router has internal ip 10.169.92.1 and we don’t have access to the machine, my head department has but is a bit tricky situation
I installed pfsense on a machine set lan interface at 10.169.92.30 and left wan network at DHCP type. I need to connect with a crossover or normal UTP cable from wan card to the router ?
then i am going to follow your instructions on setting up the squid, as we need a proxy server.
thanks for any answers, and sorry if I made any mistakes since my native language is Greek.
@Polyvios Michaelides
You can use a single interface setup for your scenario. But the installation time both network should UP. You should give two same rage ip addresses for LAN as well as WAN Dont set WAN address with DHCP.
Eg 10.169.92.30 and 10.169.92.31.
WAN IP should have internet enabled (Check DNS address too)
Use Normal UTP cable to connect WAN to Router/switch
Good luck !
every worked as a charmed… but the router cisco 3850 needed cross cable, anyway.
At the Lan interface settings I bridge with WAN, is that ok? untill it was bridge all the traffic was cut of.